Sunday, January 27, 2013

Pleated Clutch from Charm Stitch


Every year, my high school friends and I do a holiday gift exchange.  Over the years, it has turned into more of a gift-card exchange.  Being a sewist, I always like to make a little something to make the gift more personal.


I found this tutorial from Charm Stitch and thought it would be perfect for my always-fashionable friend.  I didn't create my own design on the fabric as they suggest, but I did fuse batting to the lining fabric, and add the handle and flower pin...


...and a black metal zipper.


I love the pops of yellow against the simple black and white.  (I was tempted to use hot pink, but figured this was a bit more classic/conservative.  I think she would have gone for pink, though, raised in the '80's on Cyndi Lauper and Madonna!)


Just the right size for a coffee gift card.


This is the first flower I made for it, but didn't think there was enough contrast.  Also, I'm much happier with the finished edge on the final flower vs. the frayed edge on this one.

It was fun to sew something new, and the pattern was well-written.  Thank you to Charm Stitch for sharing!


Thursday, January 24, 2013

Fleece Cuffs Tutorial


I found a cute mitten and hat set for little A a while back.  But...the mitten cuff doesn't cover much of her wrist, which is especially problematic in the snow and these cold New England days.


I realized it would be pretty easy to sew a longer cuff and attach it, but hadn't gotten around to it.  Then, today, we saw something similar to what I had in mind, and I wouldn't have to sew it to the mitten (score!).  For the $12.99 price, and the very simple design, I knew I would be making up a few pairs when we got home.  


The thumb hole holds the cuff in place, and the cuff is long enough to go over her sleeve.  Problem solved!  


Think you want to make some too?  This is a VERY simple sewing project - even the most beginner can do it!

You'll need two pieces of fleece.  For the kids' size, I did 6" x 6", but you could alter to make longer.  Just make sure you cut the width measurement along the stretchy grain of the fleece.

Next, finish the ends (the stretchy sides).  Really, you don't have to with fleece, but I always prefer the look.
If you don't have a serger, read on - I'll show you how with a regular machine, too!


Fold cuffs right sides together and sew the long edge (length).


Make a scant 1/2" snip on the fold 1/2" down from top edge.  


Turn right side out.  That's it!  You can wear these under gloves or mittens, or simply as fingerless mittens.  On the website of the brand we saw at the store, they make the point that kids can tuck in sleeves with these cuffs, put their coats on and STILL zip up independently!  Genius!

If you are serger-less, here's what you can do:

Zig zag top and bottom edges.  Set your machine to zig zag and turn the handwheel until the needle is on the far right of the stitch. Place your fabric under the presser foot up against the needle.  Now, when you sew, the zig zag will encase the raw edge of the fabric.  


Right sides together, simply sew the long edge with a 1/4" seam.  No need to finish.  Snip the hole and turn.


These are my size, so the measurements are 7" wide and 8" long.  I cut the hole about an inch down from the top and about an inch wide.


The very best part about these fleece cuffs?  Little ones still have access to their thumbs!  

Stay warm!


Saturday, January 12, 2013

Jane of All Trades is expanding!


Somebody is turning 6 soon!


My very-crafty-in-every-way aunt gave her a sewing machine.   


Not one to be left behind, the little one set herself up at MY machine the next day.


Pretty good form for a 3 year old!

So, I predict I will be completing less projects of my own and becoming more of a consultant (and fabric cutter, b/c those scissors are still way too sharp for those cute fingers!).


Thursday, January 10, 2013

Teeny tiny snack sacks tutorial


I will warn you: these are a little addictive to make (maybe because I keep using food-related fabric?).
If you are up for the temptation, you will need:


one 10.5" x 3.5" piece of ripstop nylon (or liner of your choice)
one 10.5" x 3.5" piece of cotton fabric
one 2" piece of velcro (poky and soft sides)


Sew the soft velcro in the center of one end of the nylon, positioned 3/4" down from edge.


Fuse wrong side of fabric to wrong side of nylon.
**If using a directional print, turn it upside down and keep velcro at top.**


Here it is fused with velcro on the inside.


Round top corners.


Finish opposite short end (serge or zigzag or bias tape, as in this tutorial).  Sew poky velcro 1" down from finished edge and centered on the fabric.


Fold bottom edge up 3.5".  Finger press fold.  If you have a craft label, sew on now.


Starting at the bottom corner, serge (or otherwise finish) around the snack sack, ending at the other bottom corner.  Fray check ends of stitching.
  
 Pack some cookies and enjoy your new teeny tiny snack sack!


New apron pattern

 
 I'll post the Teeny Tiny Snack Sack tutorial soon, but wanted to share these quickly.


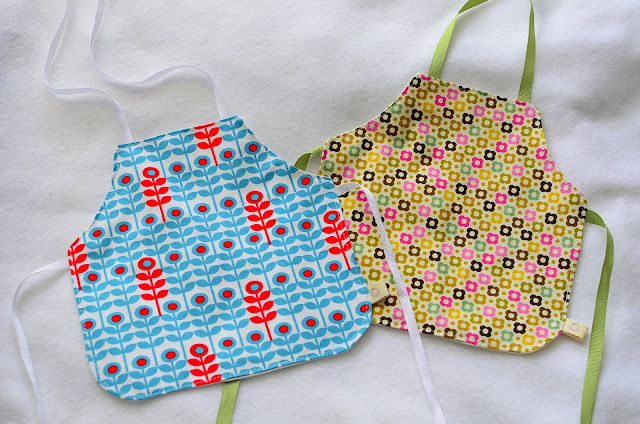
I was testing this pattern and am pretty happy with the results.  A cotton apron with grosgrain ribbon ties, backed with coordinating solid cotton.

Of course, they are miniature-sized for these girls.


Perfect for little fingers learning to tie (I might add velcro and shorten the ends for the little one in our house).

 
 And...if you're wondering about the adorable headbands (which come in matching human size), my friend Lindsay makes them.  Find them here at Pretty Little Things.  


Even though the girl on the left is wearing a ball gown and fur-trimmed gloves, she's ready to bake up a batch of cake pops!  
 
Why does anything miniature-size make me giggle?
See more here, here and here.


Tuesday, January 8, 2013

Teeny tiny snack sacks


 We have a Daisy Girl Scout in our house (and a Daisy Girl Scout leader!).  Do you know it's almost Girl Scout Cookie time in New England?


Almost as good as those tasty Samoas is a teeny tiny snack sack to pack them in!  (Disclaimer: this is NOT a tasty Samoa featured but a cheap Target cookie - the good stuff isn't in yet!)


Just the right size for one cookie for a special lunch treat...


...and just the right size for little fingers. 


Would you like to make some?  Check back tomorrow for the tutorial.

P.S. This would also make a great change purse, small gift bag, envelope for little love notes.

LinkWithin

Related Posts Plugin for WordPress, Blogger...