Showing posts with label children. Show all posts

Thursday, March 6, 2014

Kids' craft: repurposed owls

 
I stumbled across this adorable tutorial for paper tube owls through Craft Gossip.  Seemed just the thing for the resident preschooler home on a chilly afternoon.  The first grader jumped right in when she got home from school.  What a great project when both kids are equally engaged!

 
I always love crafting with the kids because theirs come out SO much more creative than mine!  Can you tell which one is mine?  Hint: it's the most boring by far!

 
I hope, by creating these owls, we are inviting spring to arrive (any day now, PLEASE!) in New England.  I'm pretty sure I have been smelling it in the air, despite the piles of snow and frigid temperatures.  Call me crazy!

Sunday, August 25, 2013

Crafty Warning!!

water bottle holder
If you purchase a copy of Sewing School 2: Lessons in Machine Sewing; 20 Projects Kids Will Love to Make, you might create a sewing monster!  We certainly have one in our house!
sleepy bear
As I said in my book review HERE, these projects are so appealing and accessible for young sewists.  Little E has been sewing up a storm, and is SO proud of her accomplishments (could her smile be any wider?). 


I am enjoying being able to repurpose so many scraps and see them turned into something wonderful and loveable.

I'll be back soon to share some of my completed projects - just in time for school!  And, I'll have another book review and giveaway soon. Stay tuned!


Wednesday, July 10, 2013

Sewing School 2 Book Review and Giveaway!


I'm so excited for today's post - a book review and giveaway.  The mom, teacher and sewist in me all LOVE this book and think it's a must-have for any young crafter!

Our review copy arrived just before the last day of school - perfect timing for planning out some summer projects.  My little sewist (age 6 1/2) has been eager to sew on her machine, but I've been a bit stumped as to how to make projects accessible, fun and appealing to her.  Thank goodness for Sewing School 2: Lessons in Machine Sewing!  There are over 20 projects organized into four kid-appropriate chapters: "In My Room", "Let's Go", "Time to Play", and "The Great Outdoors".


The book starts out with a series of 12 lessons to start young sewists with the basic skills they'll need to complete the projects.  The book is written for children, but certainly doesn't "talk down" to its readers.  I found the information to be concise, quite clear and intuitive.  For example, some standard sewing terms that could be confusing were changed - "good side" vs. "right side", "one-way print" vs. "directional", and "everything else scissors". 

Speaking of which, the book offers up realistic suggestions for setting up a sewing space, and supplying it with kid-appropriate tools.  Again, not watering anything down - these kids are using real fabric scissors, but they are ones suggested for younger fingers.  And, all the suggestions are accessible - with a few simple ground rules and supplies, anybody can get sewing.  And, that's just what we did!


Little E's first job was to choose some projects that appealed to her.  To help that process, all the projects in the book are rated with one, two or three stars.  Always positive and supportive, the language used to describe these ratings talk about how much time the project might take (vs.level of difficulty). 

Each project has a list of materials needed, and skills used in that project.  Additionally, the authors provide page references to go back review those skills.  Throughout the directions for each project are quotes from kids that help reinforce lessons and points.  These are visually appealing, appearing in little speech bubbles with a fun font.


All the patterns for the book are located in the back in a very sturdy pocket.  There is a list of all pattern pieces on the pocket for easy location.  My favorite of all is that most of the pattern pieces have a picture of the completed project right on them!  So, for even the emerging reader, s/he can be independent finding the necessary pattern for the project. 


Little E chose the "Art-to-Go-Go" project first.  Another thing I marvel at with this book is that it offers multiple suggestions for how to customize each project.  So, while very much encouraging creativity, it provides guidance and support to young sewists.  The directions for this project call for felt, but we found this great piece of corduroy little E wanted to use.  


The authors suggest using chalk to trace and mark patterns (including "stop and start marks" when sewing "good sides" together).  I discovered Pilot FriXion Ball Erasable Gel Pens and have been using them in my sewing.  It marks fabric easily and disappears with heat (erasing or ironing).  I LOVE this pen for sewing with a little one!  


This book incorporates beautifully clear photographs to show each step of each project.  All the "models" are kids, and the projects are sure to show imperfections - supporting the authors' ground rule that "nothing has to be perfect".  I think it really helps young sewists see similarly-finished projects in the book.  


Here's little E's completed "Art-to-Go-Go" case - customized for the materials she wanted utilizing the books' directions.  Upon completion, we went out for pizza, and the art case came with us.  I wish you could have seen how proud and grown-up little E was pulling out her art supplies at the dinner table.


Soon after our book arrived and little E finished her first project, we were heading out on vacation.  But, look what came with us!  She picked two projects, gathered all the materials and packed them up.  Another appealing aspect about Sewing School 2: Lessons in Machine Sewing is that the projects are all things kids can really use.  And, the materials are basic and easily-attained, never calling for anything expensive.  Little E was able to "shop" my sewing supplies and fabric, and pack it all in this bag.


Little E tried out the "Extra Pocket and Belt" project as well.  It was her first foray into handsewing, and I found it soooo helpful to have the book spell it out for her.  I read the directions, and she followed step-by-step.


As soon as she finished the project, she put it on and headed to the beach to collect shells.


Sewing School 2: Lessons in Machine Sewing makes sewing fun, appealing and accessible to kids.  Projects are clear, interesting, and manageable.  Even my 6 1/2 year old could finish a two-start project within an hour or so.  She is so proud of her accomplishments.


So...have I teased you enough with how wonderful and amazing this book truly is?  Would you like a chance to win your very own copy?


Leave a comment telling how you learned to sew, or with whom you would use this book.

Giveaway will be open for the next week.  Winner will be announced Wednesday, July 17th.  Open to U.S. residents only (sorry, international readers - but PLEASE click on any Sewing School 2: Lessons in Machine Sewing or photo for the link to purchase).  

And, just for fun, I'm also giving a pack of Pilot FriXion Ball Erasable Gel Pens  to two lucky winners!  Winners for the book and pens will be chosen at random.

Thank you to Alee at Storey Publishing for asking me to be a part of the Sewing School 2: Lessons in Machine Sewing blog tour.  For more reviews of the book and chances to win your own copy, check out the full tour HERE.

Good luck and happy sewing!


Thursday, January 24, 2013

Fleece Cuffs Tutorial


I found a cute mitten and hat set for little A a while back.  But...the mitten cuff doesn't cover much of her wrist, which is especially problematic in the snow and these cold New England days.


I realized it would be pretty easy to sew a longer cuff and attach it, but hadn't gotten around to it.  Then, today, we saw something similar to what I had in mind, and I wouldn't have to sew it to the mitten (score!).  For the $12.99 price, and the very simple design, I knew I would be making up a few pairs when we got home.  


The thumb hole holds the cuff in place, and the cuff is long enough to go over her sleeve.  Problem solved!  


Think you want to make some too?  This is a VERY simple sewing project - even the most beginner can do it!

You'll need two pieces of fleece.  For the kids' size, I did 6" x 6", but you could alter to make longer.  Just make sure you cut the width measurement along the stretchy grain of the fleece.

Next, finish the ends (the stretchy sides).  Really, you don't have to with fleece, but I always prefer the look.
If you don't have a serger, read on - I'll show you how with a regular machine, too!


Fold cuffs right sides together and sew the long edge (length).


Make a scant 1/2" snip on the fold 1/2" down from top edge.  


Turn right side out.  That's it!  You can wear these under gloves or mittens, or simply as fingerless mittens.  On the website of the brand we saw at the store, they make the point that kids can tuck in sleeves with these cuffs, put their coats on and STILL zip up independently!  Genius!

If you are serger-less, here's what you can do:

Zig zag top and bottom edges.  Set your machine to zig zag and turn the handwheel until the needle is on the far right of the stitch. Place your fabric under the presser foot up against the needle.  Now, when you sew, the zig zag will encase the raw edge of the fabric.  


Right sides together, simply sew the long edge with a 1/4" seam.  No need to finish.  Snip the hole and turn.


These are my size, so the measurements are 7" wide and 8" long.  I cut the hole about an inch down from the top and about an inch wide.


The very best part about these fleece cuffs?  Little ones still have access to their thumbs!  

Stay warm!


Tuesday, January 8, 2013

Teeny tiny snack sacks


 We have a Daisy Girl Scout in our house (and a Daisy Girl Scout leader!).  Do you know it's almost Girl Scout Cookie time in New England?


Almost as good as those tasty Samoas is a teeny tiny snack sack to pack them in!  (Disclaimer: this is NOT a tasty Samoa featured but a cheap Target cookie - the good stuff isn't in yet!)


Just the right size for one cookie for a special lunch treat...


...and just the right size for little fingers. 


Would you like to make some?  Check back tomorrow for the tutorial.

P.S. This would also make a great change purse, small gift bag, envelope for little love notes.

Wednesday, December 5, 2012

Free Gingerbread Printables

Link Love!
 
Hey there!
 
 
Just popping in to share a link I just found and can't wait to print out!  It's a group of children's illustrators who each designed a gingerbread house to print out and assemble.  They are adorable, and just the kind of afterschool crafty project we need around here!
 
 
Enjoy!


Tuesday, October 16, 2012

Kids' Art Smock made with reusable shopping bags: a tutorial


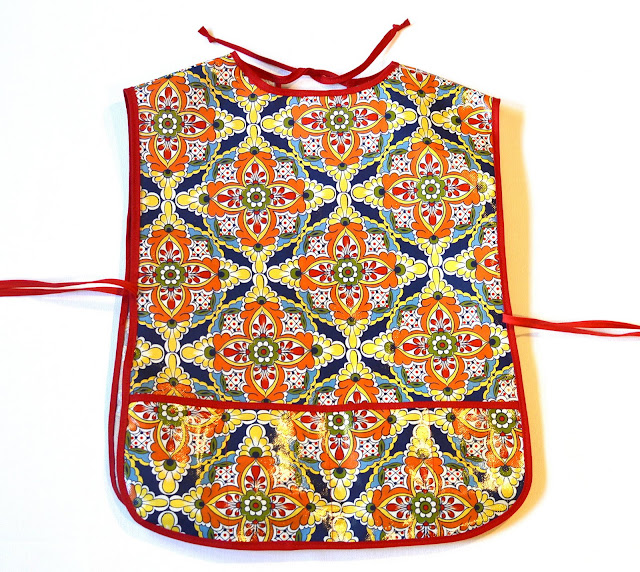
Last week, I gave away a handsewn oilcloth art smock
Did anybody notice all the bias tape binding on it? 
Would you like to make your own?


You can make this with any material (preferably something waterproof and wipeable).  Oilcloth can be hard to find and doesn't have a huge variety of prints (that I can find).  Laminated cotton is just super expensive for a project that is going to be used for kid's art!  So...I opted for those cute, cheap shopping bags they now seem to sell everywhere!

This smock has a pocket with spaces for all your "arting" materials.


For this project you will need:
one patterned reusable shopping bag
5 yards 1/4" wide double-fold bias tape (make your own following this tutorial!)


Step 1: cut off the sides of the bag


Step 2: cut the top and handles off the bag


Step 3: fold the bag, right sides together


Step 4: trace and cut out one front, one back and one pocket piece
(pattern here)
To print pattern, select "actual size" and "poster" to tile pages.  Overlap at least .5".


Step 5: sew binding to top of pocket (see here for how to)

Step 6: pin and then baste pocket onto front of smock
mark the pocket binding in fourths  (hard to see my pins in the photo!)
and sew straight down, making sure to backstitch at the top edge


This is the back side of the front - you can see the stitching much better - basting around the edge, and three sewn lines to create four pockets


Step 7: sew binding around back opening


Step 8: sew shoulders, making sure to backstitch at beginning and end of seam


Step 9: measure 7" from one end of bias tape
at the 7" mark, pin to one side of neck


Step 10: starting at end of bias tape, stitch bias tape together and then continue past pin to sew bias tape around neckline.  Continue 7" beyond back opening edge (where bias tape overlaps).


Step 11: Cut four 10" pieces of bias and sew along each long end
knot one end of each tie
sew to smock about 3" above pocket binding on front left and right
sew to smock back, matching placement from front ties

Step 12: starting at the bottom center back, sew bias tape around bottom, up side, around armhole, down front side, across front bottom, up other front side, around other armhole, down back side and finishing at starting point (see here for how to finish).  As you sew, make sure you encase the ends of the four ties.

It should look like this when done! 


 Now, try it on your little ones and see what they choose to create! 


LinkWithin

Related Posts Plugin for WordPress, Blogger...