Wednesday, July 4, 2012

Happy Fourth of July!

 
And, happy anniversary to Mr. Jane of All Trades! 

I'm not much of a gusher, but I will say I am one very lucky lady to have married, and be married to, such a wonderful, kind, funny, loving (not to mention cute) guy.

It's still fireworks for us, baby!

Tuesday, July 3, 2012

Pasta Estate a la Capri


This week's recipe is extra special.  I get to feature my mom, who has made this dish for me for as long as I can remember.  It is one of my all-time favorite summer dishes, and is so versatile.  While the actual recipe is quite simple, you can do so much with it, it's a must-have.  As an added bonus for me, we are at the beach this week - a place that holds so many childhood memories, and promises to be a place of memories with my girls now.

One of the main ingredients of this week's recipe is tomatoes, which calls for a trip to the local vegetable stand.  I have been going to this stand with my mom for as long as I can remember - always pulling in for ripe, red tomatoes or juicy fresh peaches.  One time, I was picking wildflowers on the side of the stand while waiting.  My mom apologized to the owner, thinking he might be offended.  He just said, "Oh, no problem.  Katherine Hepburn was here earlier doing the same." 

To give you a flavor of the season, and of this beautiful place, I'm including a few photos of the stand.  Scroll down for the recipe.


For this week's recipe, you will need:
  • 3-4 large ripe tomatoes
  • olive oil
  • 1 6 oz. can black olives
  • 2 cloves garlic
  • 1 cup basil (about 25 large leaves)
 
Measure 1 cup olive oil and pour into a large bowl.
 
Press garlic cloves and add to oil.  Stir to mix.


Chop olives (reserve a few for snacking while you work) and add to bowl.


Chop tomatoes and add to bowl.


Chop basil (at home, I use my kitchen shears for long, thin strips) and add to bowl.


Add a scant teaspoon of salt and mix well.


You can serve the salad at this point, use as a bruschetta topping, or toss with freshly cooked hot pasta and mozzarella.  Lately, I've been cubing day-old bread and mixing it in - much less messy than bruschetta but just as tasty. 
 
Thank you, mamacita, for sharing one of my favorites this week!  You're the best!

Saturday, June 30, 2012

Easy Peasy PUL-lined Lunch Bag

 
School is out!  Are your little ones on the go this summer - to camp, daycare, poutings?  If so, this is the lunch bag for you! 
Have no fear of sewing with PUL!  I will show you how to make this super simple, super duper cute bag that you'll find is your go-to lunch/snack/anything bag!
 
You can customize this tutorial, too!  Do you want to zigzag the edges? pink the edges? serge the edges?  Do you want a coordinating fabric for the handles and sides?  You decide, and let's get sewing!
 
Materials:
  • two 5" x 9" panels, either of main fabric or coordinating fabric (I went with red for this bag)
  • two 5" x 9" panels of PUL
  • one 7 1/2" x 26" panel for the front/bottom/back piece
  • one 7 1/2" x 26" panel of PUL
  • one 3" x 9" piece for the handle, main fabric or coordinating
  • one 1 1/2" x 8" fusible fleece
  • two 1 1/2" pieces of pokey velcro (I know, such technical terminology!)
  • two 3" pieces of soft velcro
  • quilt basting spray (I'm a huge fan of Sulky but my local store doesn't carry it anymore!  I chose June Tailor - choose something non-toxic!)
 
1. Fuse PUL pieces to same size fabric pieces, wrong sides together, with basting spray.  This will make the fabric and PUL act as one piece of fabric - no slippery PUL to work with now!  Trim so edges match.
 
2. Finish edges of front/back/bottom piece and two side panels.  In these photos, I show serging, but you can pink or zigzag, too.
 
3. Round corners of velcro a bit.  On top front of main piece, place velcro 1/2" from side, and just under stitching on top.  Sew in place, making sure to backstitch/lockstitch.
*If you have a directional print, lay main piece with print right side up.  Sew pokey velcro to the top.  This will ensure that the print faces right side up on the front flap and front when you are done.
 
4. On inside opposite end of main piece, place 3" soft velcro 1/2" from top stitching, and 1" from side stitching.  Sew in place, making sure to backstitch/lockstitch.
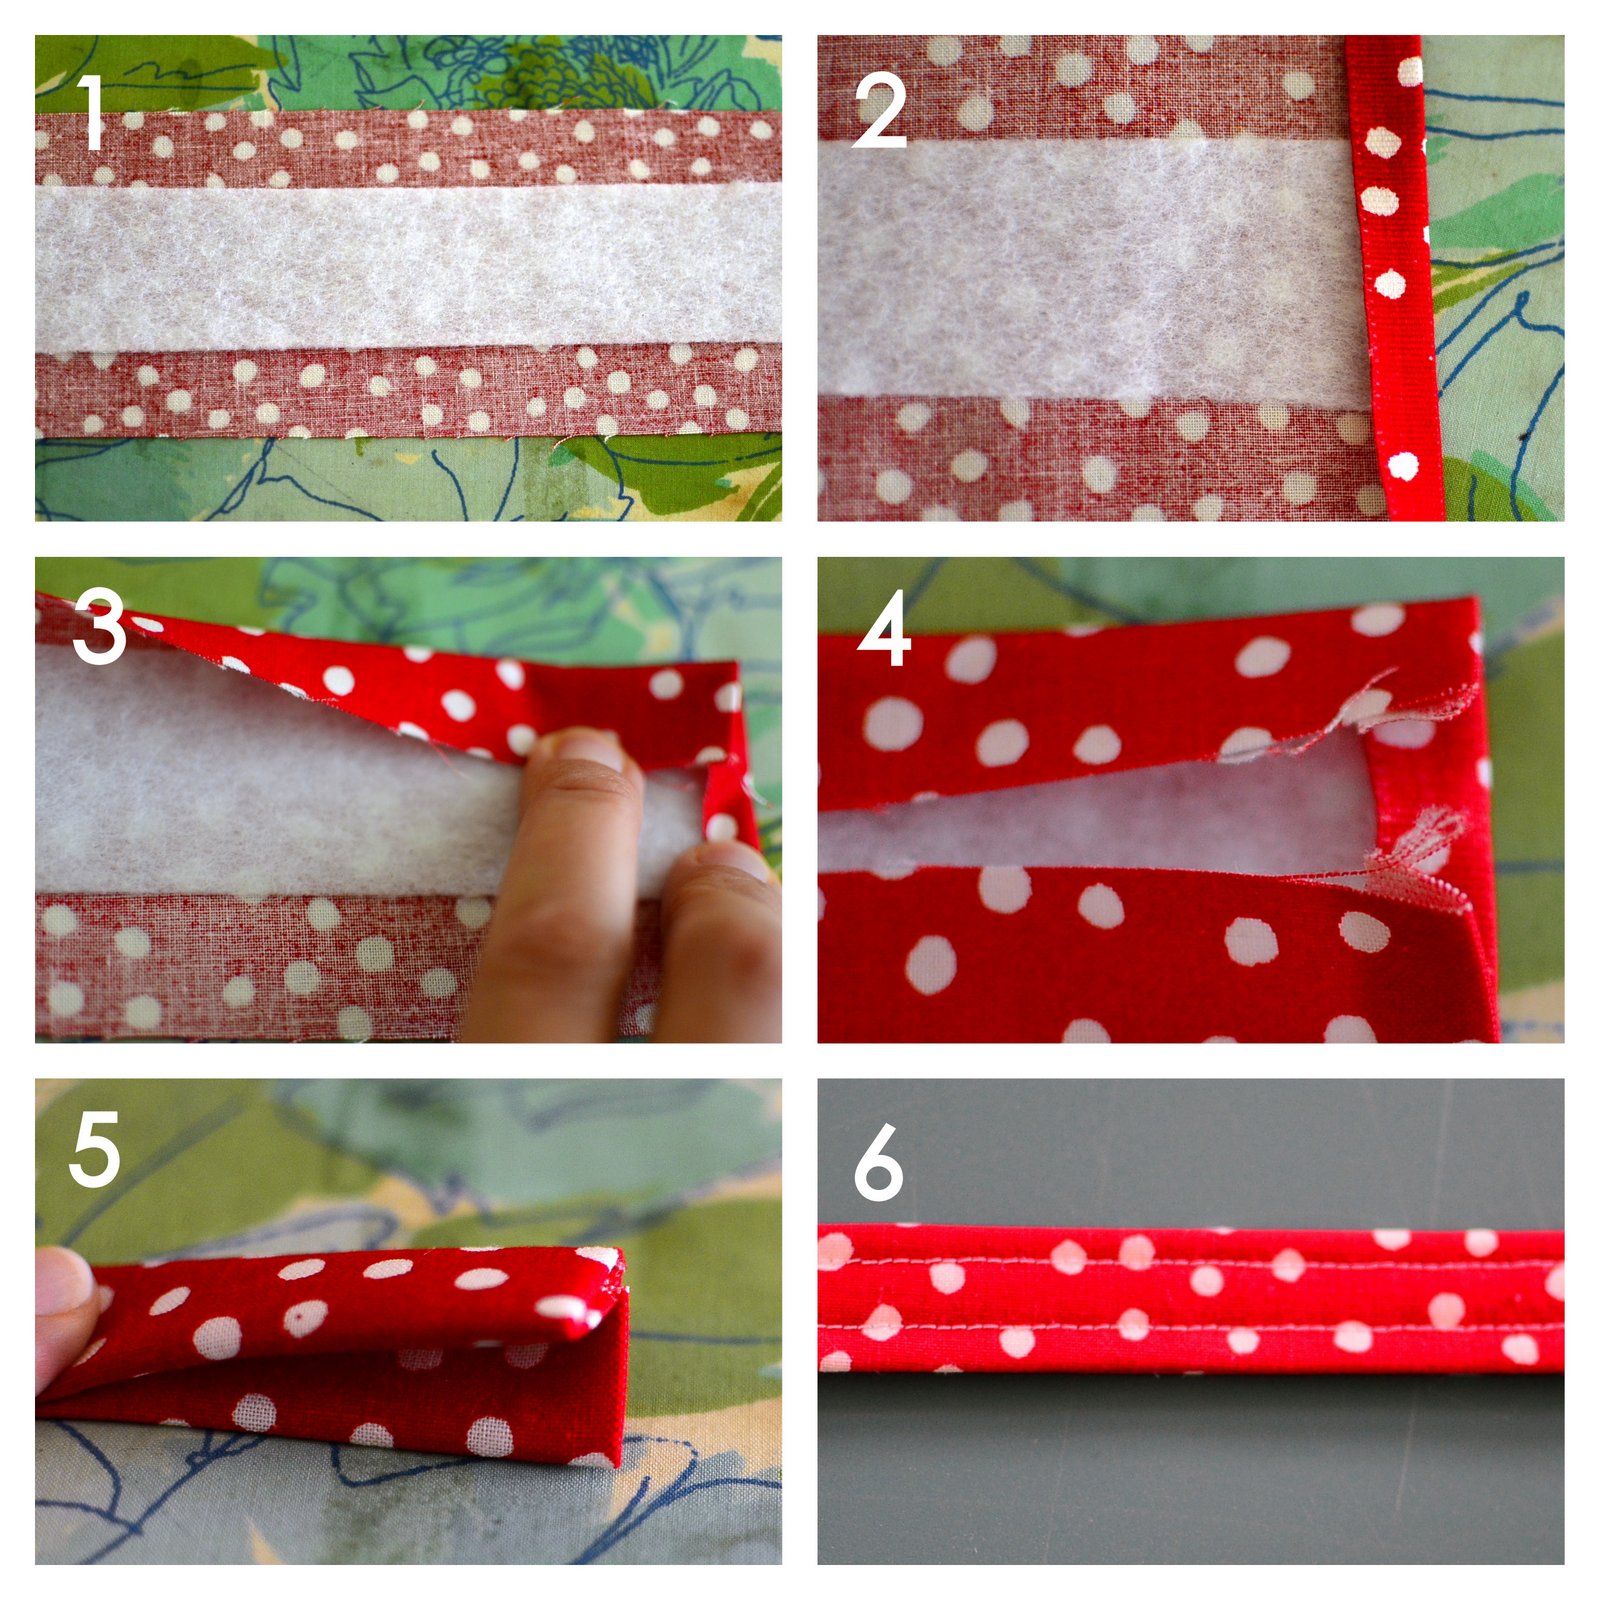
 
5.  Make the handle:
  • fuse fleece to wrong side of handle piece, centered
  • fold 1/4" in at each short edge and press
  • fold long sides in to center and press
  • fold handle in half and press again
  • topstich along sides and down middle
 
  • Measure width of handle (mine is 7/8").  
 
  • Measure this width from the bottom stitching up and mark a line.  This will help you stitch an even box when attaching handles.
 

6.  Measure 1 1/2" from each side, and 5" from top.  Draw this corner (see my white dotted lines?) for handle placement.
 

7.  Place handle end into drawn corner (making sure folded edge is on the outside) and sew in place.
 

8.  Follow the bottom seam of handle and the line you drew in step 5 for your horizontal stitching.  Sew an "x" within this square to reinforce handle.
 

9.  Sew side panel to main piece:
  • line up short side of side panel (line AD) with top front of main piece (where your pokey velcro is) - wrong sides together
 

  • Backstitch/lockstitch at point A and sew to point B with a 1 cm (3/8") seam allowance.  
 
  • Stop at 1 cm before end, lift presser foot and pivot side panel piece to that line BC is now matched to the edge of your main piece.
 
  • Talk to it until it lays flat and then sew from B to C.  Repeat for remaining edge (line CD) of side panel.  Then repeat for other side panel.
* If you finished the edges with pinking shears, you will need to sew around the top flap as well.  Simply continue sewing from point D down the side of the front flap, along the bottom edge, and up the other side.  Stop when you reach your beginning stitching at point A.  Backstitch/lockstitch.
 

That's it!  You are done, and can stand back and admire your amazing new lunch bag!  
 

Or...go pack it for whatever adventure lies ahead today!


One new sewing tutorial every day.

LinkWithin

Related Posts Plugin for WordPress, Blogger...