Showing posts with label piping. Show all posts

Sunday, October 27, 2013

Custom Halloween Pillows


A while back, I fell in love with this pillow.  It was on my list of Halloween crafts, but I just hadn't found the right template for my oversize couch pillows (remember them from this?). 


Flash forward a few weeks, and I found the above skeleton sketch in the trash!  Little E had drawn it to carve on her pumpkin, but didn't like it after all.  I pulled it out, enlarged it on the copier and turned it into a felt applique for the pillow cover.  Instead of a blanket stitch, I made coordinating felt piping (see here for the how-to).  I didn't have to worry about cutting on the bias because the felt is stretchy enough with the straight cut.  I basically followed these directions to make the pillow. 


With one pillow done, I was inspired to cover the other two in the same fashion.  Little E supplied the ghost.  Little A was more hesitant to draw on demand, so I found one of her drawings of a happy face and turned the hair into a stem.  Can you keep a straight face when you look at him?

 
I'm so excited to have festive, custom pillow covers for the Halloween season.  They are even more special because they are based on my girls' art work.  I know we'll have fun pulling them out every year and remembering their 4 and almost 7 year old versions of these Halloween classics. 


Wednesday, March 27, 2013

Girls' Night Out Clutch: Glitzy


For today's clutch (see my other ones HERE and HERE, I need some advice.  I found this fabric that, if you look closely, has flecks of metallic running through it.  


I sewed it up with the purple piping, thinking it would draw out the purple tones in the fabric.


It does make for a stark contrast, but...


...would gold have been better?  I think it looks more glitzy (read: '70's disco) with the gold, but not sure if the piping takes away from the subtle gold in the fabric.


Leave a comment and let me know what you think.  I'll count it as one entry into Friday's giveaway!


Sunday, January 27, 2013

Pleated Clutch from Charm Stitch


Every year, my high school friends and I do a holiday gift exchange.  Over the years, it has turned into more of a gift-card exchange.  Being a sewist, I always like to make a little something to make the gift more personal.


I found this tutorial from Charm Stitch and thought it would be perfect for my always-fashionable friend.  I didn't create my own design on the fabric as they suggest, but I did fuse batting to the lining fabric, and add the handle and flower pin...


...and a black metal zipper.


I love the pops of yellow against the simple black and white.  (I was tempted to use hot pink, but figured this was a bit more classic/conservative.  I think she would have gone for pink, though, raised in the '80's on Cyndi Lauper and Madonna!)


Just the right size for a coffee gift card.


This is the first flower I made for it, but didn't think there was enough contrast.  Also, I'm much happier with the finished edge on the final flower vs. the frayed edge on this one.

It was fun to sew something new, and the pattern was well-written.  Thank you to Charm Stitch for sharing!


Wednesday, November 14, 2012

Living with Punks floor cushion - with homemade piping


With bias tape and now piping on the brain, I've been collecting ideas and projects perfect for utilizing both.  I loved this one from Living with Punks - a Land of Nod knock off floor cushion.   So...when I was in Joann's last weekend with 50% off their red tag, I couldn't pass up this faux cream leather and faux turquoise suede!


I opted for the fabric covered button accent to give it a bit more pop.


And altered the pattern a bit to include a side zipper.  MUCH easier to stuff and then close with a zipper (the tutorial has you handstitch closed - this material is a bit thick for handstitching).  On that note, I did really like the look of the handle, but was having a very hard time sewing with all the layers of piping and faux leather.  My "be kind to self" mantra kicked in and I threw the handle in the trash.  Oh well. 


I think the cushion was well-received despite the missing handle. 


What do you think?


Just a few more days to enter the Mirabelle Messenger Bag pattern GIVEAWAY!


Tuesday, November 6, 2012

Make your own piping tutorial


For this week's Bias Tape Tuesday, I want to show you how easy it is to turn your homemade bias tape into piping.  Piping is such a great way to make your projects pop with a little extra detail - why not be able to use the perfect fabric?  And...there are lots of times you will want to use matching piping and bias tape (like the Retro Travel Bag).  Don't limit yourself to store-bought bias and piping!  Read on and learn to make your own!


Here's the perfect example of store-bought vs. homemade.

I pulled out this owl corduroy for a new project.  I put the store-bought bias tape up against it - the color is good, but the material doesn't match, it is a bit shiny, and the texture is flat.


Now, here's my homemade bias: textured corduroy, cute print with matching colors to accent owl print, and not shiny (I think the sheen looks weird with soft corduroy!).   MUCH better than the store-bought stuff.  But...this pattern calls for piping too, so, rather than sacrifice that cute bias, I'll just make my own piping with the polka dot corduroy.  Easy peasy.


Start by making bias strips (see tutorial here).  For how wide to make it, I looked this up.  The suggested formula was actually too small, so I had to remake.  For reference, my cording was 5/32".  I made the bias strip 1 1/2" wide.  This worked very well.

Once you make your strip, fold in half (no need to press) and place cording in fold.  Make sure to leave a bit of the cording sticking out. 


Hold the folded bias in one hand like a taco, and pin with the other.  Pin right up next to the cording to make it taut.  Continue folding, pinching and pinning all the way down.  (A little tip: make sure your pins follow the direction you plan to sew - makes it much easier to pull out!)


At each end, pin the cording to the fabric (it would stink to do all this work and then have the cording slip out!).


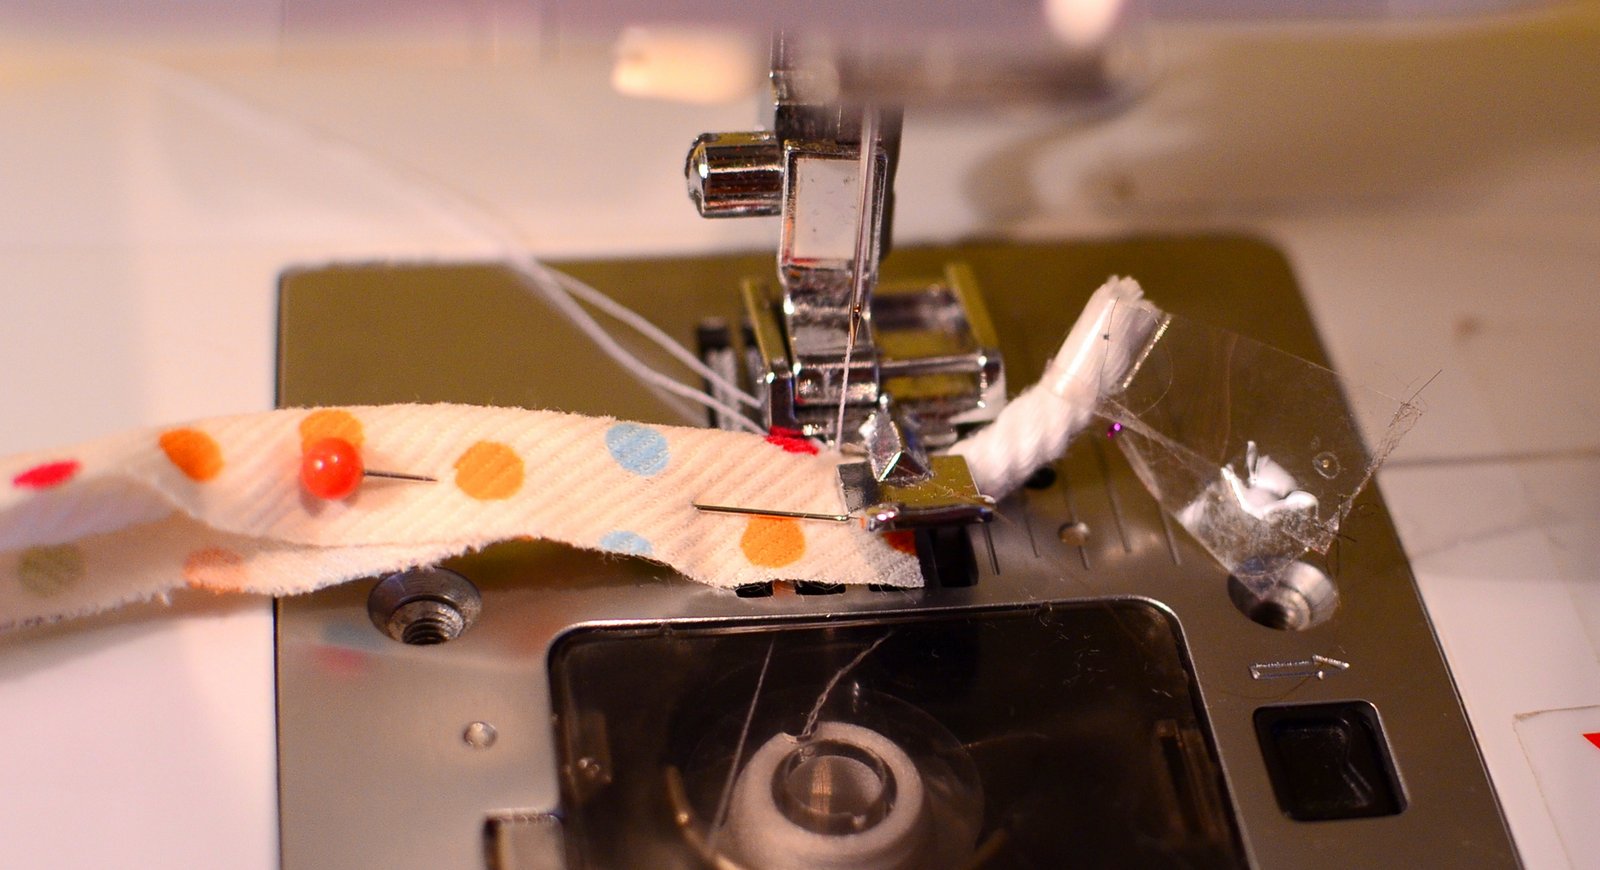
With your zipper foot, start by stitching across the end to secure the cording to the fabric. 


Then, turn and sew down the length of the piping, keeping your needle right up against the cording.  Make sure the raw edges match up - the more you pin, the easier this will be - the piping tends to roll a bit, making the raw edges come unmatched.


Stitch across the other end to secure and you are done!  Lovely, homemade piping perfectly matching your homemade bias.


Now, go use it in a cute new project!  (What could that be?  Stay tuned for more information and a giveaway!)


Tuesday, October 30, 2012

In retrospect...a pattern review

Caroline from Sew Can She recently asked me to guest post on her blog.  I got to pick whichever tutorial I wanted to try out and then post about it.  What follows is what will be posted on her blog:

Hello, Sew Can She readers!  I'm popping over from my blog, Jane of All Trades, to share my latest project - the Retro Travel Bag from Melissa Mortensen.

Before Caroline asked me to guest post, I had bookmarked this bag as a must-do.  Melissa's choice of fabric and color combinations is adorable!  I'm a girl who likes a challenge, and a new bag!

Here's Melissa's version:


For fall, I wanted something a little different.  I remembered I had a red tweed-ish fabric (intended for a skirt years ago, but never made it out of the stash) that I thought would be cute for the autumnal version of Melissa's bag. 

Here's my version: 


It ends up being much bigger than I had expected, but definitely a travel bag.  (For measurement's sake, I fit 6 rolled up beach towels in it!)  Now I'm even more excited for an upcoming get-away weekend with Mr. Jane of All Trades!

In retrospect, I wish I had either used a brown tone for the bias/lining/piping/handles, or a softer gray color.  The black is just a bit too much of a contrast.  I didn't realize until I started working closely with the fabric that it has a bit of a rust color in the weave.  Oh well.   Hopefully I'm the only one looking that closely!

As for the pattern itself, she is correct in stating that this is an intermediate/advanced pattern.  To pace yourself, I suggest cutting all fabric and interfacing one night, sewing exterior another night, and sewing interior and putting it all together a third night.

Also, I realized there were no seam allowances included!  I did my best to guess based on what I was sewing (piping, bias tape, zipper) and it, luckily, all matched up.

For the piping around the outer edge, I started by folding down about a half inch, as show below, and sewing this down.


At the end of the piping, I overlapped the end with the previously-folded part and sewed over, as shown below. 


Then snip the ends within the seam allowance, as shown below. 


The result is a nice, almost-seamless joining of piping.  I suggest doing this at the bottom so it is less noticeable. 


Another minor change was in making the handle tabs.  The pattern has you sew the pieces, turn right side out and then fold in a 1/4".  Maybe I'm just not good at this, but I highly prefer pressing the 1/4" first (wrong sides together), and then sewing right sides together and turning. 


I didn't have the required length for the Timtex/Peltex bottom so grafted two pieces together.  I think it works better to overlap the two pieces by a fair amount (about 4" here).  This ensures that the bottom stays rigid, despite the two pieces.  I simply zigzagged over the edge to attach. 
 
 Here's a peek at the inside of the bag - a lined pocket edged with bias tape.  This would definitely be big enough to store toiletries tall and wide (hairbrush, hairspray) as well as wallet, phone, etc. 


If I were to make this bag again, I would love to try a gray tweed/wool (a leather piping would be super chic).  I also think an exterior pocket would be easy to add (just follow the directions for the interior pocket but attach to one exterior piece before adding piping) and perfect for sliding your travel literature - magazines, books, print-outs of directions or coupons! 

Thanks, Caroline, for asking me to guest post. If it weren't for this opportunity, I probably would have just admired Melissa's bag instead of jumping in and making one for myself! 
 

LinkWithin

Related Posts Plugin for WordPress, Blogger...