Pages

Monday, December 31, 2012

Crafty Resolutions

 
Tomorrow starts a new year.  With that comes renewed crafty energy and hopes.  Among mine are:

get better at lighting in photography

learn to use this to make some clothing for myself

bite the bullet and redo some things around the house!

What are your hopes and dreams for the new year?

Happy 2013!


Friday, December 21, 2012

Zip pouch from Zaaberry


Little E is in her first ballet performance this weekend.  She has a list of things to bring, including make-up (!) and extra hair supplies.  What better excuse to try out Zaaberry's Zip Pouch tutorial!?


I found these laminated cotton remnants at Stitch Lounge for $1.50 each - more than enough to make a pouch.  And, the zippers were on clearance too!


I had the lining fabric in my stash - a pretty good match - and a great way to use up an old scrap.
 
The best part is that this zip pouch is large enough to hold all Little E's supplies without being overly big.  And...it was a quick and easy project - I was able to get it done while the girls were having "quiet time" (I put that in quotes because it was neither quiet, or much time).

Thanks, Ruby, for a great tutorial!


Sunday, December 16, 2012

Printable Letter to Santa from I'm Feelin' Crafty

LetterToSanta-Title-I'mFeelin'Crafty

Just saw this via Craft Gossip and had to print out immediately!  How adorable!  Click on the picture for your own.

Wednesday, December 12, 2012

Business card holder from The Crafty Cupboard: with a twist


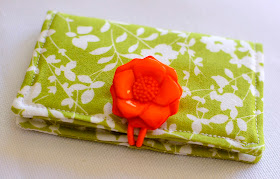
I LOVE this business card holder pattern from The Crafty Cupboard.  I made my first one to match a new spring bag and loved having a special place to put my crafty card.  When a friend requested one for her growing photography business, I had an epiphany.


To hem the top of the pockets, Melanie has you fold 1/4" and fold 1/4" again and press.  I don't know about you, but my fingers and iron don't get along - especially when folding tiny hems!  BUT...I did just treat myself to a few new hemmer feet, which are perfect for this job!

To use a hemmer foot to make the pocket hem, I cut one piece for the pocket 2 1/2" x 10" (instead of two 2 1/2" x 4 1/2" pieces).  My math is not off - I gave myself an extra inch to get the rolled hem going.


I found this tutorial that explains how to get the rolled hem started.   Sew about an inch and leave a long thread tail.


I found finger pressing 1/4" helped make it feed through the foot more evenly.


Start feeding the raw edge into the foot, using the long tail to help manipulate from the back.


Guide the fabric over the coil in the foot.


Gently use the long thread tail to pull the fabric as you start to sew.  See how the fabric on the right is going into the foot and folding over on itself?  And, more importantly, see how it is coming out on the left side all pressed and sewn!?


Here it is done (in seconds!). 
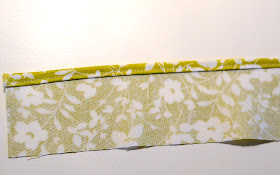

Now, take your 2 1/2" x 10" piece and cut into the required two 2 1/2" x 4 1/2" pieces.  Discard the extra inch (if the beginning of your hem was a bit wonky, throw that part away!).


Continue following the pattern as written and you'll have a swanky new business card holder in no time! 


Thursday, December 6, 2012

Zippered Yarn Sacks from Just Crafty Enough


Hey there!
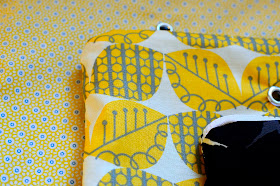
Just a quick pop in to share my latest completed project - zippered yarn sacks from Just Crafty Enough.  The only change I made was to round the corners before sewing.  The first two have a slightly rounded corner.  The yellow polka dot has a larger rounded corner.  I think I prefer the smaller.  What do you think?


There are a few knitters in my life who will be receiving these for Christmas.


I love the eyelet for the yarn to pop through!  No more balls of yarn rolling all over the floor while you try to knit.  And, a set of three might keep projects that use more than one ball from getting all tangled (ask me how I know these things!).


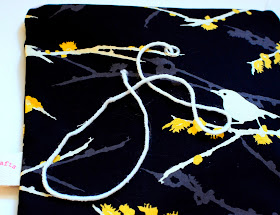
I'm especially excited about the yellow and gray fabrics - two of which I recently bought at Stitch Lounge - a very fun new find in Western Massachusetts.  If you are local, you definitely have to check out Jenna's space - it's just lovely!
 
A peek inside at the coordinating fabrics.

Hope you are enjoying some crafting-for-the-holidays!


Wednesday, December 5, 2012

Free Gingerbread Printables

Link Love!
 
Hey there!
 
 
Just popping in to share a link I just found and can't wait to print out!  It's a group of children's illustrators who each designed a gingerbread house to print out and assemble.  They are adorable, and just the kind of afterschool crafty project we need around here!
 
 
Enjoy!


Wednesday, November 28, 2012

Morning view 2


While waiting for the bus...

Tuesday, November 27, 2012

Burlap Placemat Tutorial from Zaaberry

 
Happy Tuesday, everyone! 
I'm pleased to have my good friend Ruby over from Zaaberry to share her Burlap Placemat Tutorial.  Just in time for the holidays, there are so many variations on this simple idea - go wild! 
 
 
Hi everyone, this is Ruby of Zaaberry.   I've been sewing off and on since I was a child, though my passion was really rekindled with the birth of my daughter.  These days, it has taken on a force of its own.  I love to sew pretty much anything and everything and probably, like most crafters, have a zillion projects going at once, only some of which get finished on time.  It's been so much fun following Roselee's Bias Tape Series each week.  I'm really flattered and excited to be included. The project I'm sharing today is a very simple way to dress up a table and definitely falls into the category of instant gratifcation.  Take a peek around at my other tutorials while you're visiting and let me know what you think. 
 
click on the photo to see the tutorial


Thursday, November 22, 2012

Gobble gobble

artwork courtesy of little E
Happy Thanksgiving!

Tuesday, November 20, 2012

Fancy Dish Gloves from the Happier Homemaker


For this week's Bias Tape Tuesday installment, I wanted to share a project using single fold bias tape.  I stumbled across this tutorial and couldn't wait to try it - especially with the holidays coming - what a great hostess gift!  Useful and (my favorite) whimsical!


Single fold bias tape is what is pictured below.  It is frequently used for facing armholes in apparel.  I think I've seen it used to hem a skirt, too.  This is what you make when using the bias tape tool.  For the gloves, I simply used this single fold bias tape instead of ribbon.  Because you can make your own, you can pick whatever pattern matches your gloves and ruffle (I had this leftover green from a different project). 


Simply place the bias tape, opening side down, over seam and edgestitch.  I used the leftovers to make the little bows to cover up where the bias tape overlapped.


The only problem will be deciding who gets these!  They are too cute!  And, the fabric is from Heather Bailey's Nicey Jane collection - how could a Jane of All Trades resist? 
 
 Happy Thanksgiving!


Friday, November 16, 2012

Winner winner!


Thank you to all who entered the Mirabelle Messenger Bag pattern giveaway!  I loved reading all your ideas, and think I have a few more bags to make based on your creativity and vision!

Without further ado, our winner is....
...Christi, who said "I would love to try making this bag in one of the new laminated cotton fabrics that are out! This is so cute...."


Christi, please send me your email so I can send you the pattern!  Congratulations!
 
And, for those of you lovely readers who didn't win, you can still buy a copy of the pattern HERE and HERE.
Happy sewing!


Thanksgiving is for being thankful...

...and I love this idea for the family!  I think my little ones are just the right age to start this tradition.

 Click on the picture for the link to print your own.  Enjoy!