Pages

Monday, December 13, 2010

Pocket o' chocolate holiday tags

For today's big adventure, the girls and I checked out our new local food market - a cross between Trader Joe's, B.J.'s and IKEA.  While it won't become our one-stop grocery, we did find some treats - these little holiday chocolates.  At $1.49 for a bag of 12, why not buy one (or three) we thought.  As we drove along our merry way, little E and I discussed our sweet thrifty find and what we could do with 36 or so chocolate characters.  One idea led to another until, "Wouldn't it be neat to make a gift tag with a little pocket for the chocolate?  A chocolate pocket!"  So....here's how we did it (or, really, how I did it while baby A napped and little E had a ton of fun "arting" with my fabric scraps, glue, "stamples" and paper):

 1.  Gather chocolates or some other small treat for your pocket tags.


 2. Dig through your scraps for festive fabric - cut into 2 inch squares and iron if needed.

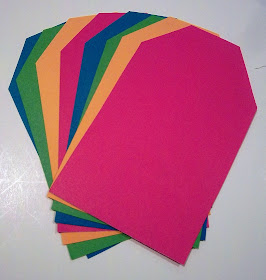
 3.  Find some card stock and cut into simple tag shape.  Mine ended up being as follows:


 4. Pink all four sides of fabric squares (perfection NOT necessary!).


 5. Place fabric on tag for desired placement (NOTE: this pocket is a bit tall - after sewing this one, I trimmed the rest down about a 1/2 inch").


 6. Sew sides and botton, using a 3/8" seam.  Backstitch at each end.  I found it helpful to lengthen stitch a bit and go slowly (and it helped to give a loving nudge to the paper as it fed through the machine).


 8. Label tag for your intended recipient and add the chocolate.  See the snowman peeking out?


 9.  Make lots more because they are so easy, and who doesn't love chocolate?


 10.  If you don't have a fancy new food market in town, try some mini-candy canes instead!  (For a snugger fit, you can cut the fabric a bit shorter in width.)


 11. Stand back and imagine the grin on their little faces when they see they have presents AND chocolate to open on Christmas day.


 12. And, because this is such a taxing craft project (note: sarcastic tone), don't forget to treat yourself to some chocolate too! 


Happy crafting!

Tuesday, December 7, 2010

Crafting for the holidays

The holiday season is upon us, and I love this time of year for so many reasons - especially having an extra incentive to create for friends and family.  I feel a bit like an elf these days, working on varied projects for the girls, for a few small craft fairs, and gifts.  This year, BabyE has had an influx of requests and orders, and it has been fun coming up with new projects and ideas to fulfill different wish lists.
First up on this mini-roundup, part 1, is the Snow Blossom Hat from Made by Rae.  Here's little A modeling hers, complete with dimples and two front teeth.  Although the straps were tricky to turn, they are VERY worth it as this is the only hat that will stay on her head!  Thank you, Rae!
Next up, a few crochet flower headbands for this past weekend's crafty open house.  (By the way, with all the creating I've done lately, I have few photos apart from my blurry phone ones to show the new and improved craft table set-up.  While not a project to sell or give away, it definitely counts on my list of recent creations.)  I saw similar headbands up in VT a few weekends ago and got that familiar "I can make those!" feeling - so I did!  I love the simple cotton yarn and color combinations.  And, they really are cute for young and old alike.

Lastly, a new apron design for BabyE.  Usually I do simple aprons, but a friend requested a "waitress" style for her little girl who loves to play restaurant.  It was really fun checking out different styles and ideas on-line.  I found this one and figured out how to recreate it for a smaller size.  The lace edge is vintage and has been sitting in my trim drawer just waiting for the right project.

So...just a few of the many projects pouring out of my little sewing and crafting space these past weeks. 
I just picked up the new Amy Butler book and am looking forward to picking out a holiday project for my sister-in-law (Sharri, read no further!).  I also found this one which I really like, so I guess Amy and Lisa will have to duke it out for my vote.
Happy Tuesday!
 

Saturday, November 27, 2010

At-home facial a.k.a. recycled crayons

Back in Februrary, I found this great post from The Long Thread about making recycled crayons for Valentine's gifts.  BabyE and I jumped on the band wagon and made a whole bunch - for playgroup friends and all the students in my mom's first grade class.  (I was maxed out on peeling crayons for a looong time after that!)

So, flash forward to earlier this month when Chez Beeper Bebe posted about recycled crayons.  I knew it was time to pull down the giant basket of lonely bits (donated by my mom's aforementioned class) and turn them into something fabulous.

First, it took one full night to find, peel and sort crayons.  I was really excited about the mix of different shades and hues of each color - kind of a crafty mystery - what color will the final crayons be???

I was so eager to start this project, I (foolishly) started the next day during nap/quiet time.  I didn't realize how long it would take the crayons to melt down (and what a complete and utter mess it makes - thank goodness I don't love my kitchen floor anyway - it is now stained a bit red from spillage).

I had to stop, elbow-deep in the crayon melting due to the end of nap/quiet time.  Everything was out when my husband came home and commented, "It looks like a meth lab!"  God bless the husband of a crafter - he helped me figure out how to contain the melted crayon in the molds ("just mush some Play-Doh in it").  The man is a genius!

That night, I fired it all up again.  Not only is this project satisfying (those lonely old bits are magically transformed - don't they just look happier?) but it proved to be a cheap, at-home facial as well - can you see all that steam coming out of the pan?

Late that night, all the crayons were melted, molded and cool.  (Notice the very standard crayon colors?  Despite mysterious mixes of different crayons, they all melted down to create your basic roy g. biv palette.  Go figure!)  Then they were packaged into bags and labeled - ready for next weekend's crafty open house. 

I hope they find a good home!

Thursday, November 4, 2010

Cute

Today, little E asked if she could eat lunch in her room while she was "arting".  I got a little giggle out of that (and it warmed my heart to know how much she loves to create).
P.S. Glitter and water make for a very sticky clean up project!

Gotta love a quickie

A while back, my sister-in-law gave me a book about sewing different bags. I found this great tote pattern that folds up on itself and buttons (think: Envirosax), but it was actually a bit labor-intensive and I couldn't simplify it.  Call me lazy, but I like my sewing to be simple -in style, maintenance and construction.


A little dark - I was taking these photos at night in the sewing room.


So, flash forward to yesterday when I was wanting to make a little something for a friend's birthday (8 days late!) and knew she was a fold-up, environmentally-friendly tote kinda gal.  A bit short on time, I made up my own tote using the button idea, and loved it.  It was one of those projects that didn't take too much time or brain power, and I could enjoy the process, thinking of my friend walking home toting her groceries with her new bag.  Very satisfying!

All buttoned up.

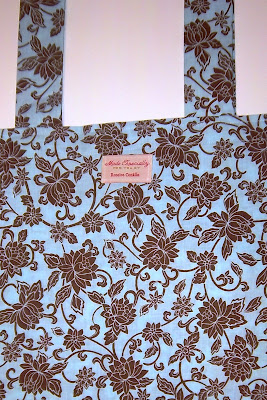
 P.S. See the label?  My aunt had those made up for me LAST year and I just rediscovered them - I love the look - kind of Cath Kidston?  If only...


Fancy crafter!
 

Tuesday, October 26, 2010

Another bunting

It's almost Halloween - hooray!  I don't know what it is about this holiday that always has me a bit giddy.  We are definitely not the family to recreate a graveyard in our front yard or go to town carving pumpkins.  But, I love my Halloween decorations that come out of the box each year, and have been enjoying creating a few new ones this year. 


First up, another bunting/garland.  I made my first appliqued bunting for little A's birthday.  I thought I would do another very similar but with square panels instead of triangles (it was kind of tricky fitting and centering the letters on the pennants).  I had planned to sew orange pom poms to connect all the letters but then saw the orange rick-rack and went with that.  After seeing an old post on Made by Rae, I decided to use the tiny black rick-rack to make little tags instead.

All in all, I like the look of this, but, let me tell you:  it is NOT easy to slide tiny rick-rack along a larger rick-rack length.  And....if you want to get a photo of your completed project, don't do it on a windy day - these letters were flipping around all over the place!  (Where I actually hang the bunting inside is in our stairwell - the light is really tricky for getting a good photo.)

Also, if you have a dog, you might want to keep him inside for your outdoor photo shoot or he might grab the bunting and run for it, causing a tangeld, twisted mess (not that MY dog did that...wait, yes he did.  Sigh...)

On a last, wonderfully positive note:  I found a new product that I love, love, love - Sulky Temporary Spray Adhesive.    Not using iron-on fusible web makes me feel a bit like a cheater, but it was soo easy to simply spray, stick and sew!


Happy Halloween!

Wednesday, October 13, 2010

Capturing colors

It is mid-October.  To any New Englander, this means leaf-peeping season.  Hoardes of tourists drive from all over to view the blazing golds, oranges, reds and browns of the fall leaves. 

While I savor this time of year for the leaves, I would be remiss to leave out other colors of nature that are right out my back door.  

There is something warm and comforting about finding these last hold-outs of color before the world falls into a deep hibernation under blankets of white snow.


Tuesday, September 28, 2010

Iron-y

You know how, when you're pregnant, it seems everyone else is, too?  I've been having that feeling lately about my ironing board. (Ha! I bet you thought this was a clever way to announce a bun in the oven!  Nope - just a post about my ironing board.)

Anyway, my ironing board cover has been hurting for a while.  Every time I iron hubby's pants, the diamond pattern of the metal under the board cover gets transferred onto his pants.  The cover has old interfacing glue and has worn thin.
 

Rusty?! And, see the diamond imprint?


It seems I browse the ironing board covers every time I'm in Target/Walmart but never feel like the time is right to splurge (is that what life has come to that buying a new ironing board cover is "splurging"?  perhaps I just enjoy the simpler things in life?).

Then, lovely bloggers start posting left and right about recovering their ironing boards, too!  So, I decide to do it myself (uh oh!).  I bought some super loft batting and was giddy to find that my thrifted sheet was plenty big to recover the board - hooray!  Pack rat nature pays off!


Dirty, grimy, gross!

So...I take photos of the ratty old cover, gleefully rip it off and throw it away, and set to work on the new one - only to discover that I need to IRON the new one in order to sew it together!  Old cover back on.  Complete project and really love the result (and it actually matches the color palette of its home in the play/craft room).


Ahhh...breathe a sigh of relief.

Iron-y part 2?  Had I just bought a new cover, it probably would have cost about the same!  Oh well - I feel a little bit fancy now when I iron - how many people can say that? 

Wednesday, September 22, 2010

Birthday Bunting

So, we are coming off of big birthday doings in our house.  Baby A turned one!  I guess, technically, she is no longer a baby - instead, a bona fide toddler (she is a walking fiend!) - but, still a baby in my eyes.
In honor of her big day, I made her a birthday bunting (garland, banner, etc.).  I finally cut into my Alexander Henry "City Park" fabric and love the cheery colors together.  I wish I had backed the yellow letters with something before applique-ing them on, though - they get a little lost with the blue showing through.  Anyway...

Happy Birthday, little A - you deserve a birthday sign that brings as much happiness and sunshine into the world as you bring into ours!


Tuesday, September 14, 2010

Repurposing for a purpose

So, we had little E's preschool orientation.  I offered up my (limited) sewing skills if the teacher needed anything.  She got this look in her eye, said, "Actually....", and led me over to the doll area where there were four ill-dressed babies.  "We need doll clothes," she reported.


Flannel diaper

So, with the million or so other projects on my to-do list this week and last, I set to work on a new project instead.  I have a serious mental block when it comes to sewing clothes for myself, but I was excited to try this new challenge.  I mean, are 3 and 4 year olds going to mind an uneven hem? 

 This was a great way to break into my stash of thrifted shirts (do you notice lots of stripes?) and a few other stray fabrics.  I made shirts, dresses, sleep sacks, diapers, pants, and skirts.


Pants (I goofed on the pink and blue pair but love the accidental ruffle I created)

While I cannot say these are my best work (I was going for quantity for these bare babes), it was fun and I giggled the whole time I was coming up with something else (or trying them on my "model, a similar-statured CabbagePatch doll).

Perhaps this project will even help me conquer my fear of sewing for myself (but first I have sweaters felting to make some winter gear for the babies - I hear the playground gets cold at the school...).


Tank tops (doesn't that shirring make you giggle?)


Tuesday, August 31, 2010

School on my mind

I used to teach first grade.  Every fall had a rhythm and spirit as the anticipation for school filled the air.  Since little E was born, I have been home, but I haven't been immune to that familiar feeling fall brings.  This year, she will start school for the first time (in the words of Heather Bailey, "yay-boo"). 

With thoughts of backpacks, fall clothes, nervous excitement and all things school, I was hooked when I saw this book sling project in Family Fun magazine.  The rainy weather was perfect for staying in, nesting, and creating a space in little E's room for her beloved books.

The best reward for my time and effort on this project?  Walking into little E's room and seeing her sitting on her bed, pulling out books from her book sling and reading. 


Note: I modified the project to sew rather than use adhesive, and chose a coordinating fabric for the interior.

Thursday, June 24, 2010

A new girl in town...

Just over 9 months ago, a new girl arrived on the scene here. 
Ever since, she has captured our hearts with her constant smiles (and dimples to boot), sense of humor, and long, skinny legs.

It only seems appropriate that this little doll be hers.

Just look at those legs


and that smile.


She even likes to play hide-and-seek like our new little one!


Happy weekend!

Saturday, June 5, 2010

A moment worth sharing...

I don't often craft while either daughter is up, but yesterday was an exception.  Baby A was napping and Baby E (now 3 1/2!) was happy doing her crafting (finger paints, glue, paper, and assorted paint brushes).
Anyway,  I decided to iron some fabric for a sewing project while she was keeping herself busy.  In the middle of it all, she looked up and said, "I love crafting."  Just like that! 
When she said she didn't like bacon, I had to wonder, but that confirms it - she's my girl! 

Thursday, May 20, 2010

How to make a bag for your sister-in-law (or, a lesson in what NOT to do)


I should start off by saying that I love the end result and I'm pretty sure my sister-in-law will, too. (If you are my sister-in-law, STOP looking at this right now! Your birthday isn't for another two days!) The pattern is wonderful - easy to follow, well-explained and illustrated when necessary. What follows here are MY follies from the point I decided to make a birthday gift for above-mentioned sister-in-law. So.....

    1. Decide to make a lovely gathered clutch from Noodleheads to accompany other purchased gifts.
    2. Buy enough fabric for clutch from lovely Southampton Quilts.
    3. Once home, decide to make the Pretty in Pleats bag from artsy crafty babe instead (I bought the pattern (plus another) at the end of last year - I challenge you to only buy one!).
    4. Print off pattern.
    5. Realize you do not have enough fabric from store that is a good 25 minutes away from house.
    6. Decide to attempt to shrink pattern pieces to fit fabric.
    7. Cut fabric.
    8. Realize you do NOT have enough fabric.
    9. Dig into stash to find coordinating fabric (a fourth coordinating fabric, mind you) and find an option.
    10. Cut the fabric and second-guess your choice.
    11. Dig into stash again and choose a different option.
    12. Cut the fabric with the pattern on the WRONG fold!
    13. Cut the fabric on the right fold.
    14. Second-guess this fabric and give up for the night.
    15. Go to Joann's the next day (other fabric store too far with time constraints, two little people tagging along and naps to maintain) and look for a third (or is it fourth, or fifth - I've lost count!) option for the fourth coordinating fabric.
    16. Wonder if you should just make the gathered clutch but other fabric is already cut for pattern.
    17. Buy two types of interfacing for project.
    18. Forget to use coupon.
    19. Get two little people back in car, buckled in.
    20. Realize store double charged you for stabilizer.
    21. Go back into store and fix above-mentioned error.
    22. Get home and pair two fabrics from store with other fabrics.
    23. Decide you don't like either option.
    24. Debate going forth with second stash choice or driving back to far away fabric store (skipping a park play date on the first nice day in a while).
    25. Opt to be a good mother and go to park.
    26. Sew bag with second stash choice and end up being very happy with all the fabric choices.

    Phew! Don't you just love sewing!? :)

    Thursday, May 13, 2010

    Gathered clutch from Noodleheads


    Just a quickie to post my project from today - the gathered clutch from Noodleheads - cute, easy and a little different than a regular zip pouch.
    I have to admit I wasn't planning on making it until I saw my friend Ruby's (Zaaberry) - I always love her fabric combinations and modifications. Once I saw hers, I knew I had to try one.
    I can't believe I found this fabric at Joann's. Moreover, I can't believe I found the fabric, coordinating fabric and matching ribbon with an 8 month old and 3 year old in tow!
    Speaking of modifications, I skipped all interior pockets (remember the little ones mentioned above? not a lot of time to sew here) and used ribbon for the front band - I'm a sucker for grosgrain ribbon!
    Is it horrible that this started out as a gift but I'm keeping it? hee hee