Pages

Saturday, June 30, 2012

Easy Peasy PUL-lined Lunch Bag

 
School is out!  Are your little ones on the go this summer - to camp, daycare, poutings?  If so, this is the lunch bag for you! 
Have no fear of sewing with PUL!  I will show you how to make this super simple, super duper cute bag that you'll find is your go-to lunch/snack/anything bag!
 
You can customize this tutorial, too!  Do you want to zigzag the edges? pink the edges? serge the edges?  Do you want a coordinating fabric for the handles and sides?  You decide, and let's get sewing!
 
Materials:
  • two 5" x 9" panels, either of main fabric or coordinating fabric (I went with red for this bag)
  • two 5" x 9" panels of PUL
  • one 7 1/2" x 26" panel for the front/bottom/back piece
  • one 7 1/2" x 26" panel of PUL
  • one 3" x 9" piece for the handle, main fabric or coordinating
  • one 1 1/2" x 8" fusible fleece
  • two 1 1/2" pieces of pokey velcro (I know, such technical terminology!)
  • two 3" pieces of soft velcro
  • quilt basting spray (I'm a huge fan of Sulky but my local store doesn't carry it anymore!  I chose June Tailor - choose something non-toxic!)
 
1. Fuse PUL pieces to same size fabric pieces, wrong sides together, with basting spray.  This will make the fabric and PUL act as one piece of fabric - no slippery PUL to work with now!  Trim so edges match.
 
2. Finish edges of front/back/bottom piece and two side panels.  In these photos, I show serging, but you can pink or zigzag, too.
 
3. Round corners of velcro a bit.  On top front of main piece, place velcro 1/2" from side, and just under stitching on top.  Sew in place, making sure to backstitch/lockstitch.
*If you have a directional print, lay main piece with print right side up.  Sew pokey velcro to the top.  This will ensure that the print faces right side up on the front flap and front when you are done.
 
4. On inside opposite end of main piece, place 3" soft velcro 1/2" from top stitching, and 1" from side stitching.  Sew in place, making sure to backstitch/lockstitch.
 
5.  Make the handle:
  • fuse fleece to wrong side of handle piece, centered
  • fold 1/4" in at each short edge and press
  • fold long sides in to center and press
  • fold handle in half and press again
  • topstich along sides and down middle
 
  • Measure width of handle (mine is 7/8").  
 
  • Measure this width from the bottom stitching up and mark a line.  This will help you stitch an even box when attaching handles.
 

6.  Measure 1 1/2" from each side, and 5" from top.  Draw this corner (see my white dotted lines?) for handle placement.
 

7.  Place handle end into drawn corner (making sure folded edge is on the outside) and sew in place.
 

8.  Follow the bottom seam of handle and the line you drew in step 5 for your horizontal stitching.  Sew an "x" within this square to reinforce handle.
 

9.  Sew side panel to main piece:
  • line up short side of side panel (line AD) with top front of main piece (where your pokey velcro is) - wrong sides together
 

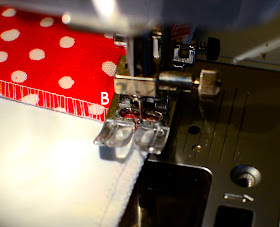
  • Backstitch/lockstitch at point A and sew to point B with a 1 cm (3/8") seam allowance.  
 
  • Stop at 1 cm before end, lift presser foot and pivot side panel piece to that line BC is now matched to the edge of your main piece.
 
  • Talk to it until it lays flat and then sew from B to C.  Repeat for remaining edge (line CD) of side panel.  Then repeat for other side panel.
* If you finished the edges with pinking shears, you will need to sew around the top flap as well.  Simply continue sewing from point D down the side of the front flap, along the bottom edge, and up the other side.  Stop when you reach your beginning stitching at point A.  Backstitch/lockstitch.
 

That's it!  You are done, and can stand back and admire your amazing new lunch bag!  
 

Or...go pack it for whatever adventure lies ahead today!


One new sewing tutorial every day.

Tuesday, June 26, 2012

Sweet and Savory Cranberry Chicken Salad


With two vegetarian options already in the Summer Salad Series, I thought it was time to add a little meat to the mix.  I am the only real meat eater in the house - hubby being vegetarian and the kids being picky-tarians.  I love to make this salad (especially if I have left over chicken) as a quick lunch or dinner option for myself.
To make it, you'll need:
 
  • 3-4 cooked, cooled chicken breasts *
  • pecans
  • dried cranberries
  • mayonnaise
  • garlic powder
  • Italian seasoning
* I just tried a new way to cook chicken breast, and the meat came out very tender - line a baking sheet with parchment paper, lay down the chicken, cover with another sheet of parchment and fold edges in.  Cook at 425 degrees for 25 minutes (for 5 chicken breasts).
 
Dice chicken into 1/2 inch pieces.
 
Add 1 cup cranberries and 1 cup pecans to chicken.
 
Sprinkle a scant 2 teaspoons of Italian seasoning and 1 1/2 teaspoons of garlic powder into the bowl.
Add mayonnaise to taste and mix together.  I actually do not like mayonnaise too much, and the other flavors carry their own weight, so I choose to use about a 1/4 cup - just enough to hold the ingredients together.

Let the salad sit in the refrigerator for at least an hour so the flavors can blend. 

Serve on its own, or on a bed of baby spinach or farm fresh spring mix.  Enjoy!


Monday, June 18, 2012

Fresh Summer Corn Salad


Welcome to week 2 of the Summer Salad Series!  This week, I'm sharing my mom's Fresh Summer Corn Salad.  If you have left over corn-on-the cob, this is the salad for you!  The bright yellow corn accented with reds and greens make this salad as good to look at as it is to eat. 


For approximately 8 servings, you'll need:
  • six ears cooked corn
  • one green pepper
  • one red pepper
  • one cucumber
  • one scallion
  • 1/2 pint grape or cherry tomatoes
  • small bunch of dill
  • olive oil
  • balsamic vinegar
  • salt and pepper to taste


First, remove the cooked kernels of corn from the cob.   


This gadget is a life saver - it adjusts to the cob size, and then you push down.


A nice, clean cut!


Break up any chunks of corn.

 
Cut the tops of the red and green peppers and remove the seeds.  Slice each pepper in half, and then into 1/2 inch strips.
 
Then, dice the strips into 1/2 inch pieces.  Add to corn.
 
Slice the scallion and add to corn.
 
Next, peel the cucumber.  Cut in half, and then quarter each of these halves.  Remove the seeds and dice into 1/2 inch pieces.  Add to corn.
 
Cut the tomatoes in half and add to corn.
 
Finely chop dill and measure about 1/6 cup.  Add more or less to taste.
 
With all your vegetables chopped and in the bowl, you are ready to make the dressing.
 
Pour 1/2 cup olive oil over salad and toss to coat.  Then, add 2T 2t (almost 3 whole T) balsamic vinegar and mix again.  Add salt and pepper to taste (notice no pepper in my photos - not a fan).  Let salad sit 1-2 hours to marinate.
 
 Enjoy your fresh summer corn salad!  This is a great dish on its own, or along side chicken or steak. 
Since making it this afternoon, I have been craving grilled chicken! 

Happy eating!


Monday, June 11, 2012

Crunchy Vegetable Slaw


First up in our Summer Salad series is this amazing Crunchy Vegetable Slaw. My friend Karen brought it over one night and I fell in love with it. I'm not usually a slaw girl, but this one has just the right balance of sweet, crunch, flavor and color. Karen bought it at the local deli, so it took a little bit to figure out what all the ingredients were, and how to make the dressing. I'm pleased to share this new favorite with you.


You'll need:

 
you can find bags of broccoli slaw at the grocery store near the carrots


Put all your prepared vegetables, berries and seeds in a large bowl and set aside.
 
Now for the dressing:
 
Pour all your dressing ingredients into a small bowl and whisk together until smooth.  It will still be quite thick.
 
Now, toss the dressing with the vegetable mix.  I like to either scoop and mix with tongs, or put the lid on the bowl and shake until mixed. 
 
Cover and place in refrigerator for at least an hour to let flavors blend (although I can never wait this long!  I'm eating a bowl as I type!)

This slaw is a delicious side dish, or a meal unto itself accompanied by a slice of roasted garlic ciabatta! 

Enjoy!