Monday, December 31, 2012

Crafty Resolutions

 
Tomorrow starts a new year.  With that comes renewed crafty energy and hopes.  Among mine are:

get better at lighting in photography

learn to use this to make some clothing for myself

bite the bullet and redo some things around the house!

What are your hopes and dreams for the new year?

Happy 2013!


Friday, December 21, 2012

Zip pouch from Zaaberry


Little E is in her first ballet performance this weekend.  She has a list of things to bring, including make-up (!) and extra hair supplies.  What better excuse to try out Zaaberry's Zip Pouch tutorial!?


I found these laminated cotton remnants at Stitch Lounge for $1.50 each - more than enough to make a pouch.  And, the zippers were on clearance too!


I had the lining fabric in my stash - a pretty good match - and a great way to use up an old scrap.
 
The best part is that this zip pouch is large enough to hold all Little E's supplies without being overly big.  And...it was a quick and easy project - I was able to get it done while the girls were having "quiet time" (I put that in quotes because it was neither quiet, or much time).

Thanks, Ruby, for a great tutorial!


Sunday, December 16, 2012

Wednesday, December 12, 2012

Business card holder from The Crafty Cupboard: with a twist


I LOVE this business card holder pattern from The Crafty Cupboard.  I made my first one to match a new spring bag and loved having a special place to put my crafty card.  When a friend requested one for her growing photography business, I had an epiphany.


To hem the top of the pockets, Melanie has you fold 1/4" and fold 1/4" again and press.  I don't know about you, but my fingers and iron don't get along - especially when folding tiny hems!  BUT...I did just treat myself to a few new hemmer feet, which are perfect for this job!

To use a hemmer foot to make the pocket hem, I cut one piece for the pocket 2 1/2" x 10" (instead of two 2 1/2" x 4 1/2" pieces).  My math is not off - I gave myself an extra inch to get the rolled hem going.


I found this tutorial that explains how to get the rolled hem started.   Sew about an inch and leave a long thread tail.


I found finger pressing 1/4" helped make it feed through the foot more evenly.


Start feeding the raw edge into the foot, using the long tail to help manipulate from the back.


Guide the fabric over the coil in the foot.


Gently use the long thread tail to pull the fabric as you start to sew.  See how the fabric on the right is going into the foot and folding over on itself?  And, more importantly, see how it is coming out on the left side all pressed and sewn!?


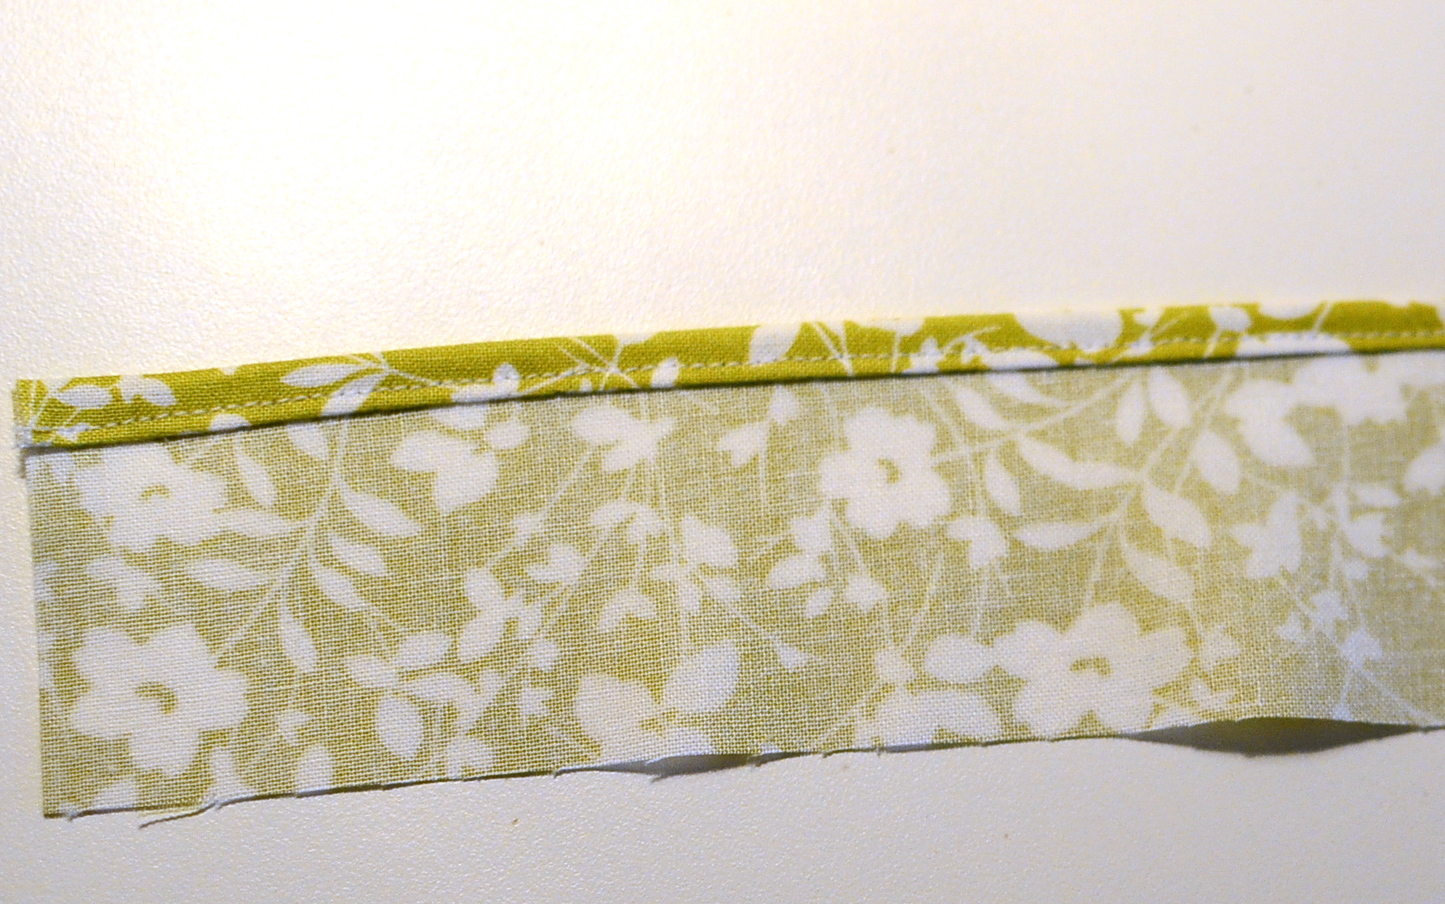
Here it is done (in seconds!). 


Now, take your 2 1/2" x 10" piece and cut into the required two 2 1/2" x 4 1/2" pieces.  Discard the extra inch (if the beginning of your hem was a bit wonky, throw that part away!).


Continue following the pattern as written and you'll have a swanky new business card holder in no time! 


Thursday, December 6, 2012

Zippered Yarn Sacks from Just Crafty Enough


Hey there!
Just a quick pop in to share my latest completed project - zippered yarn sacks from Just Crafty Enough.  The only change I made was to round the corners before sewing.  The first two have a slightly rounded corner.  The yellow polka dot has a larger rounded corner.  I think I prefer the smaller.  What do you think?


There are a few knitters in my life who will be receiving these for Christmas.


I love the eyelet for the yarn to pop through!  No more balls of yarn rolling all over the floor while you try to knit.  And, a set of three might keep projects that use more than one ball from getting all tangled (ask me how I know these things!).


I'm especially excited about the yellow and gray fabrics - two of which I recently bought at Stitch Lounge - a very fun new find in Western Massachusetts.  If you are local, you definitely have to check out Jenna's space - it's just lovely!
 
A peek inside at the coordinating fabrics.

Hope you are enjoying some crafting-for-the-holidays!


Wednesday, December 5, 2012

Free Gingerbread Printables

Link Love!
 
Hey there!
 
 
Just popping in to share a link I just found and can't wait to print out!  It's a group of children's illustrators who each designed a gingerbread house to print out and assemble.  They are adorable, and just the kind of afterschool crafty project we need around here!
 
 
Enjoy!


LinkWithin

Related Posts Plugin for WordPress, Blogger...